
In the world of interior design, stone wall cladding stands out as a timeless choice that brings a touch of nature’s beauty into the living room. This design element not only enhances the aesthetic appeal of a space but also adds a layer of texture and depth that can transform any ordinary room into a striking focal point. Whether it’s the rustic charm of rough-hewn stones or the sleek sophistication of polished marble, stone wall cladding offers a versatile range of options to fit any decor style.
Living Room Interior Stone Wall Cladding Design
Benefits of Stone Wall Cladding in Living Rooms
 Stone wall cladding provides several advantages for living rooms. It enhances aesthetics by introducing natural elements that bring warmth and richness to the space. The texture and variety of stone also add depth, transforming flat walls into eye-catching features. Moreover, stone is known for its durability, resisting wear and tear over years of use. It also offers practical benefits such as improved acoustic properties, which reduce echo in spacious living rooms. Additionally, stone maintains a cool temperature, contributing to a more comfortable environment during warmer seasons.
Popular Types of Stones Used
 A variety of stones are favored for wall cladding in living rooms, each offering unique shades and textures:
- Slate: Characterized by its fine-grained texture and availability in various shades like grey, blue, and black.
- Sandstone: Known for its rich, earthy colors that range from tan to brown and red, bringing a warm ambiance to any room.
- Limestone: Offers a lighter palette with options in cream, beige, and soft gray, perfect for a subtle, sophisticated look.
- Marble: Although more premium, marble provides a luxurious feel with its intricate veining and available in colors like white, black, and green.
These stones not only enhance the beauty of a living room but also bear characteristics that cater to longevity and less maintenance. Each type holds the potential to create distinct styles from rustic to modern, fitting seamlessly into various decor themes.
Design Ideas for Stone Wall Cladding
Rustic Charm with Natural Stone
Natural stone offers an effortless way to bring rustic charm into a living room. Integrating materials like slate, limestone, or sandstone adds instant warmth and texture. These stones present varying colors and patterns, making each installation uniquely appealing to the eye. Homeowners can highlight architectural details, such as fireplaces or accent walls, by using larger stone blocks or irregular shapes that draw attention.
Strategic lighting enhances the stone’s natural hues, deepening the sense of comfort and invitingness in the space. When paired with wooden beams or furniture, the stone helps create a cohesive look that resonates with a cottage or country style.
Modern Elegance with Manufactured Stone Panels
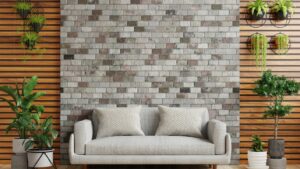 Manufactured stone panels provide a contemporary twist to stone wall cladding, boasting smoother surfaces and more uniform patterns. These panels are available in an array of finishes, from glossy to matte, accommodating any modern aesthetic. Designers often opt for lighter shades like soft grays or whites to maintain a sleek, minimalist look that brightens the room and makes it appear larger.
The versatility of manufactured stone panels allows for customization in pattern and texture, catering to personalized design needs. They’re also lighter and easier to install compared to their natural counterparts, offering a practical solution for those seeking a stylish yet low-maintenance option. Incorporating metal accents or modern art pieces with these panels can further enhance the sophistication of the living space.
The Right Tools and Techniques for Installation
Choosing the right tools and techniques is critical for a successful installation of stone wall cladding. Here are the essentials:
- Measuring Tape and Level: To ensure each stone panel is evenly placed.
- Notched Trowel and Mortar Mix: For applying adhesive evenly over the surface.
- Wet Saw: To cut stone panels to fit corners and edges accurately.
- Rubber Mallet and Spacers: Helps in aligning and placing the stones evenly without damaging them.
Apply the mortar mix to the back of each stone panel using the notched trowel. Place the panel against the wall, gently tapping it with a rubber mallet to secure it in place. Use spacers to maintain even gaps between the panels, creating a consistent look. Check the alignment with the level periodically. Allow the installation to dry for at least 24 hours before removing spacers and applying grout, if necessary, to complete the look.